
It’s easy to go do errands on your bike if you have a good cargo rack and a set of panniers, but sometimes (like when toilet paper goes on sale) you need more space. After all, toilet paper doesn’t go bad, right? You have to stock up!
What I really wanted was a big cargo trailer. For a long time I would look at web sites like Bikes at Work and dream of being table to haul obscenely large loads. When I wasn’t carrying home groceries, I could also use it to bring my little girl for rides out on the town. Other solutions, like a bakfiets or an xtracycle, also had their appeal, but with a trailer I had the option of adding the space when I needed it and then leaving it at home when I didn’t.
But…
The prices were way too high. I couldn’t justify to myself paying several hundreds of dollars for a trailer that ultimately would not be used that often. I was better off just taking the car (yes, selling the car would allow me to buy lots of fancy bikes, but that’s another discussion).
Things changed one day when I was in Harbor Freight Tools and saw this cargo carrier for only $100. Imagine – bringing home the goods on a silver platter.
The materials
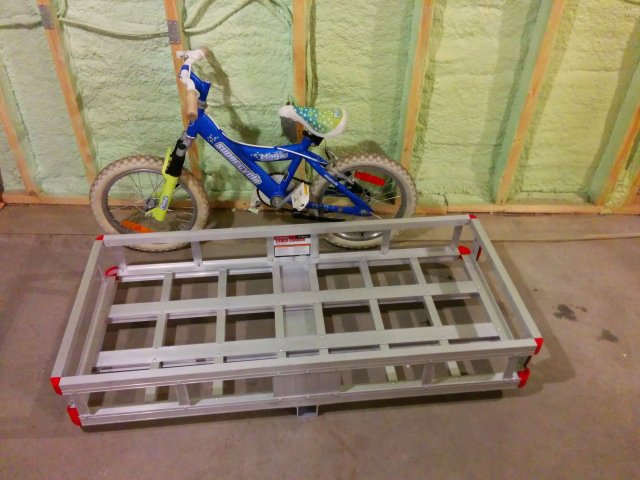
- Cargo carrier: $100
- Used kid’s bike: $10 [1]
- MEC trailer hitch block and arm: $30 [2]
- Steel rod: $5
- Stainless steel bolts / nuts: $10
Now it’s time to get to work! The plan is to remove the wheels from the bike, remove the axles from the wheels, make my own axle that I attach to the trailer, and then attach the wheels. At this point I’m thinking “This is going to be sooooooooo easy”.
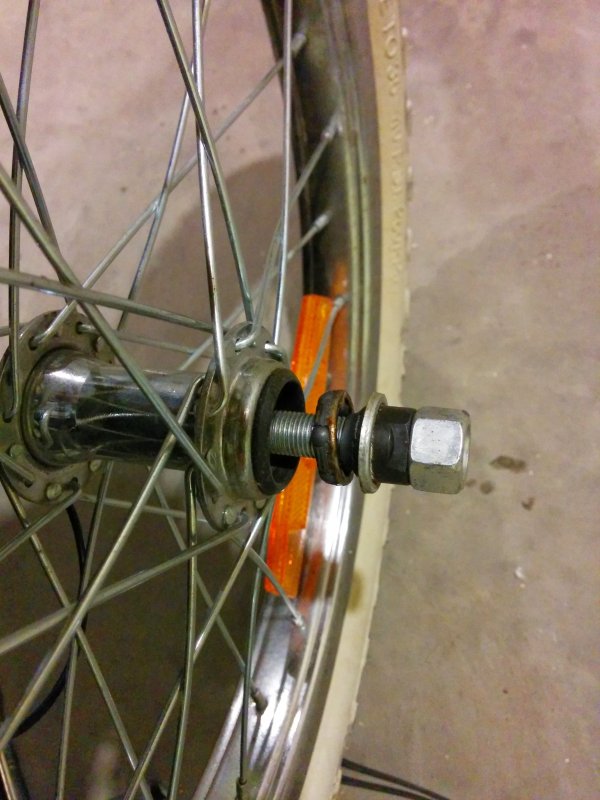
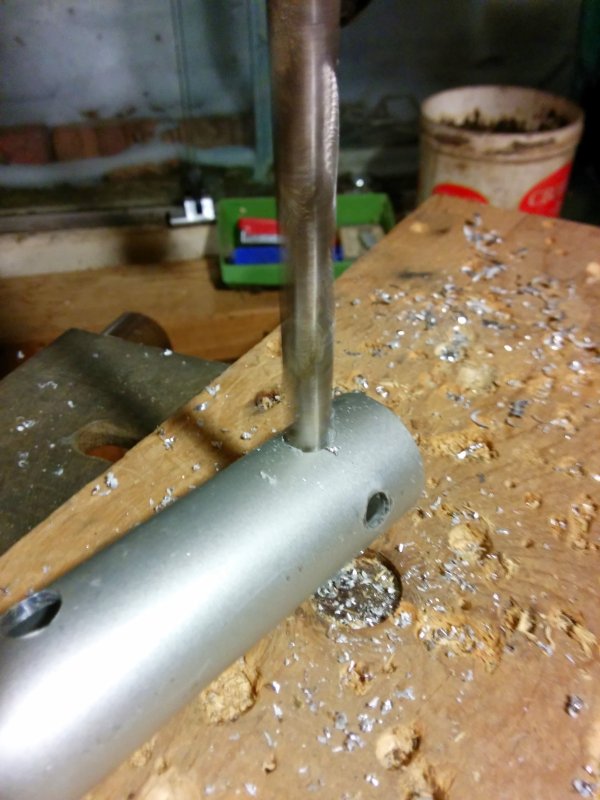
The front wheel, removing the axle. Now I see that the nut has a special shape that holds the bearings in place, and the wheels mount on the bearings. That means that I can’t just slip the wheels on the steel rod like I was hoping, instead I’ll have to use a threaded rod.
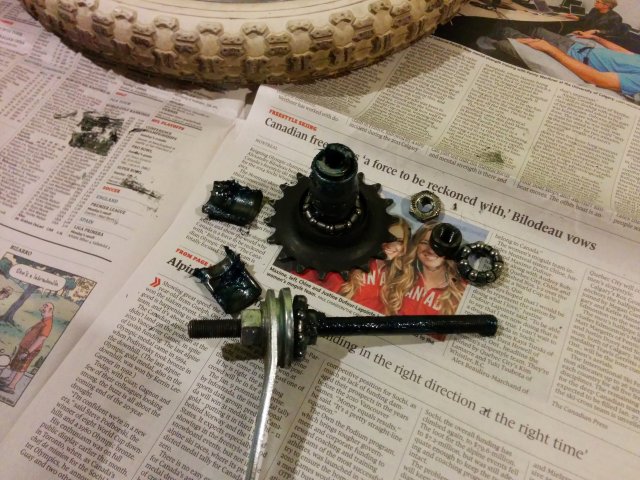
Here is the rear wheel disassembled. If you have ever wondered what a coaster brake looks like inside, here it is. Having taken it apart, it’s really quite simple how it works.
After a lot[3] of messing around I figured out that the nuts were 3/8″, 24 threads per inch. Unfortunately threaded rods don’t come in this size, so I’d have to cut my own threads, something that I’d never done before but knew was easy using a tool called a die. My dad has a set of dies, and I knew that it would be a fun son / dad bonding experience. I headed on over to my parents’ place, picking up a stainless steel rod on the way.
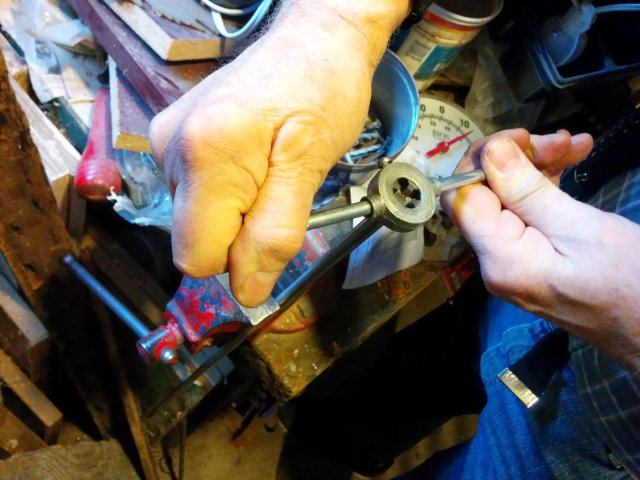
Here my dad is showing the proper technique. The die is the part in the middle and is made of very hard steel. You turn the handle around ever so gently, and slowly go back and forth, and it cuts the thread into the rod. Unfortunately, as this was my first time doing anything like this, I didn’t know that stainless steel is much, much harder than regular steel, so we ended up chewing through two dies before giving up and going back out to get a regular steel rod. That one went much faster.
 To cut the threads onto the axle, first you put a good dose of oil on the rod. This helps to lubricate the cutting action and it also keeps the rod cool a bit. The friction of the metal, even with the oil, was enough to heat up the die noticeably. We marked how far we wanted to cut the threads with the bit of tape on the left.
To get to this point had taken two evenings of work and part of an afternoon, three trips to the store, and I still didn’t have anything to show for it. But to finally start making some progress and see the shiny new, perfect threads felt pretty good.
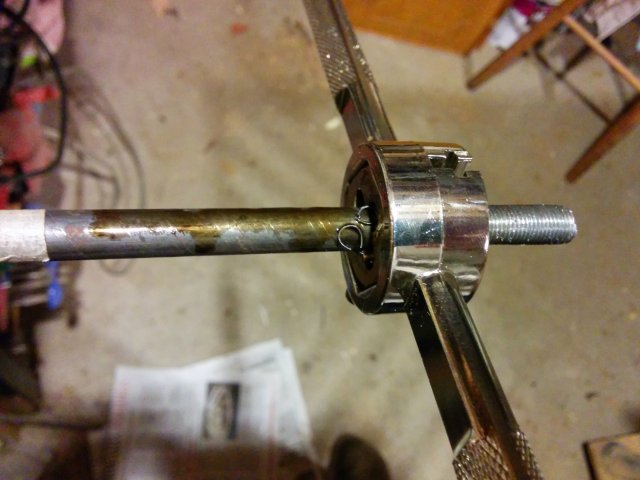
 We needed to mount the axle to the trailer somehow. To do that the plan was to take an old aluminium bar, cut two pieces from it, and then bolt it to the trailer with a hole going through it to hold the axle. Here we have marked the locations for the holes, and my dad is making a divot with a punch to make the drilling easier. This part is optional, but prevents the drill bit from skating across the metal surface.
To keep things lined up we’ve also marked which way goes up and which way goes to the front. Lots of times I’ve rushed my way along to find that one of the parts ended up being backwards.
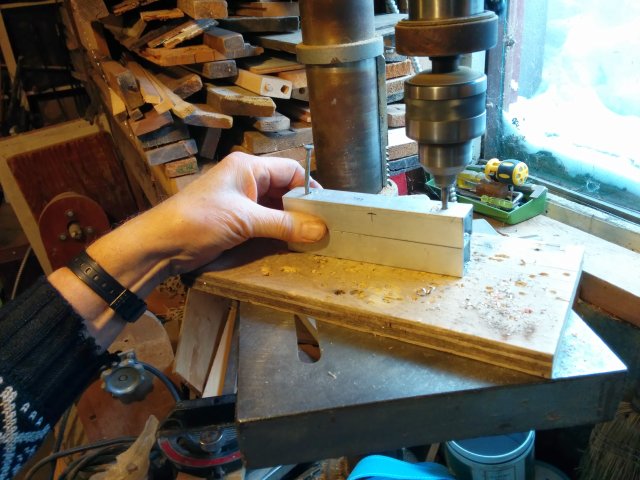 Here dad is drilling the holes through the axle mounts. To keep things nicely lined up, he stacked one on top of the other. After he cut the hole through on the left, he put the bolt in place (click to see a larger picture). This prevents it from moving when drilling the other end. We’re using a drill press, but it’s quite doable with a handheld power drill.
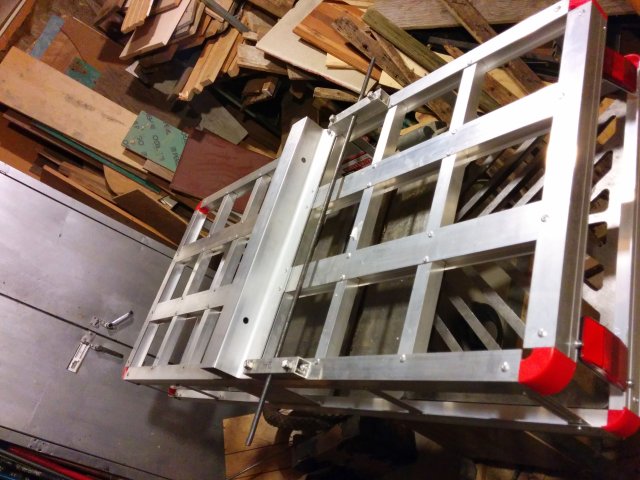
Things are starting to take shape and we are moving quickly along at this point. Here we have the trailer body, upside down, with the axle attached to it. It’s important that the wheels are parallel to one another and pointing perfectly straight. First we attached one of the mounts, then passed the axle through it and the other mount, squared everything up, and finally bolted everything down.
Drilling holes through the trailer arm so that we can bolt it to the trailer body. No magic here. Just resist the temptation to brush away the metal shavings with your hand – they are sharp!
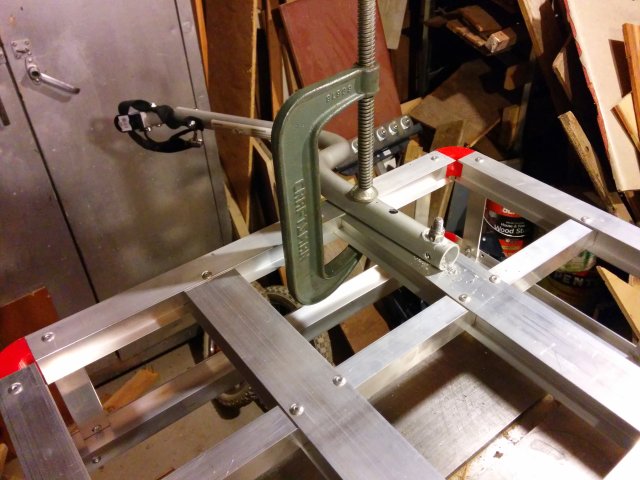
Attaching the arm to the trailer. Using a big clamp, we’re holding the arm in place, which allows us to drill holes into the trailer body and bolt it all together.
One of dad’s favourite things is silicon sealant and he we were able to break it out for this job as well. All the nuts got a dab on the threads, so that they wouldn’t wind themselves loose with the vibration but we could still loosen them with a wrench later if we needed to.
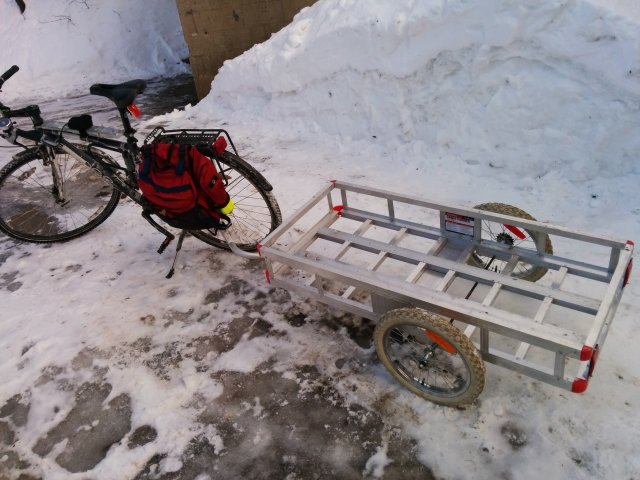
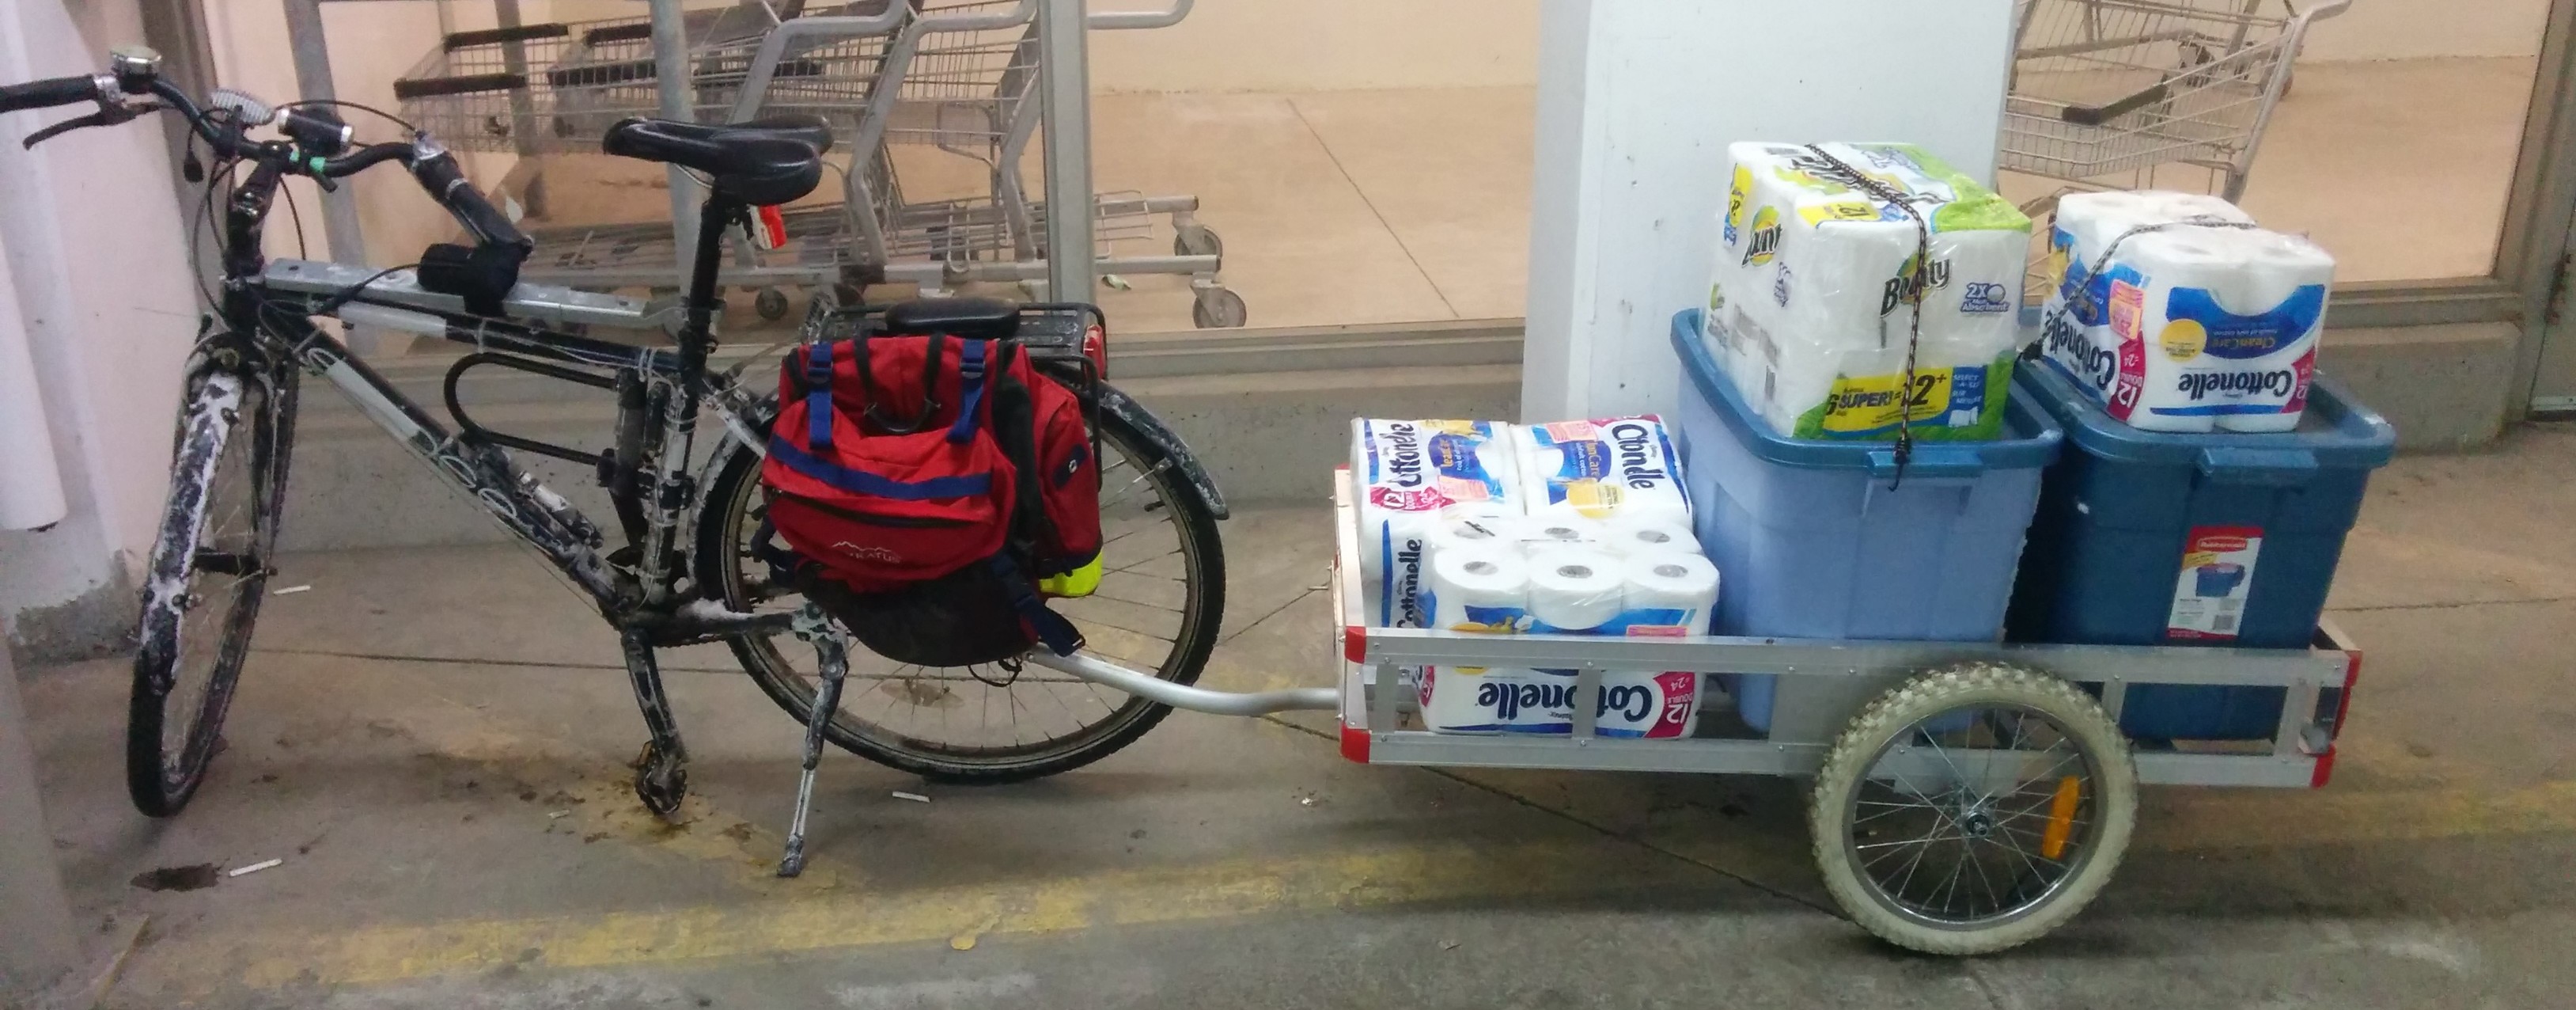
And here’s the finished product! Bolted the wheels back on and attached the trailer mount to my bike’s axle, and I’m ready to go.
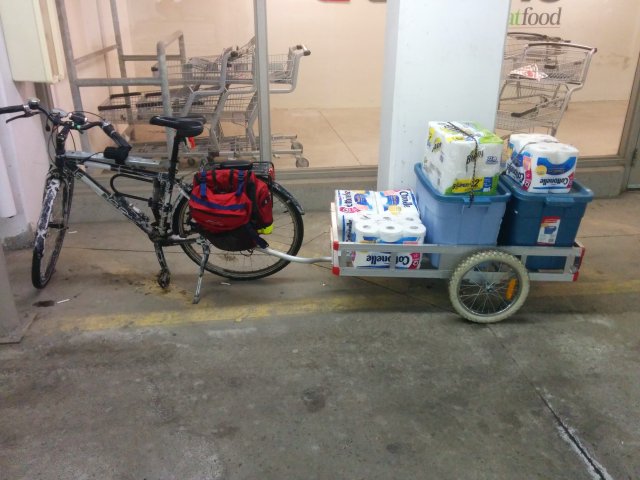
And here it is at the grocery store. I was able to get a total of 4 packs of TP and one of paper towels, as well as the regular groceries. The trailer fits 3 Rubbermaid 68 litre Roughneck storage containers side by side, giving me about 200 l of capacity. I can stack another row on top to give a whopping 400 l of space, which is more than the trunk of a Honda Civic. It’s also very light, only about 30 pounds, but was able to support 200 pounds (and I look forward to trying with more).
Was it worth it?
It took a lot of work, mostly because the cheap bolts that came with the wheels had such poor tolerances, but overall it was totally worth doing the effort of building the trailer myself instead of just going out to buy it. Not only did I get an awesome trailer, but it was great to spend time with my dad in doing it, and I learned a lot of skills that are transferable to other things that I might want to build. A month later, I was unscrewing a bolt that was rusted in place when the head sheared off. But it was no big deal, because I knew that I could just drill it out and cut new threads. Knowing how the brakes work lets me tune up my daughter’s kiddy bike and also helped me fix my Shimano Nexus brake.

It opens up a new world of possibilities. Here I picked up some ductwork on the way to the office. I’m also looking forward to my next trip to Costco using the trailer.
Thanks for reading my little write up. Have you built anything similar? If so, leave a comment below to share.
Update: After many trips the bearings in the wheels couldn’t support the weight. I bought some better wheels from Wike for $80 and with them I’ve been running smoothly.
Update 2: After a year I wrote up another post with the cumulated wisdom and enhancements.
[1] It doesn’t have to be a kid’s bike, I just need the wheels. These can be found for free in the summer all the time around here, but this was January.
[2] I was able to get the arm for $12 because they had one that was really scratched up. At that price it’s not worth it trying to make my own.
[3] Before I went to get a threaded rod I wanted to make sure that the threads were the same for the front and rear axles. So I tried to take one of the nuts from the front axle to screw on to the rear. It didn’t work. I got it most of the way on, but then it got stuck. Shoot. It was really close though, like one was metric and the other imperial.
So I took a nut from each axle and went off to all the different hardware stores around. Everyone agreed that one of them was a 3/8 inch, fine pitch (24 threads / inch) but nobody could figure out what the other one was. Finally I went to Ottawa Fastener Supply and the guy said to come back with the rest of the bike, it was too hard to tell with just the nut. I had the rest with me so right away he could tell that both the front and back were the same, but the nut was cheap and wasn’t exactly right. We got another 3/8 inch fine nut and could screw it on without problems. Wasted a few hours because of a cheap nut.
13 thoughts on “My Home-Made Bike Trailer”
I am in the middle of making a handmade bike basket out of an old picnic basket for my younger sister who is new to biking. I am having a similar experience, with my mom helping with some of the sewing elements.
Looks great!
Sweet! Thanks for posting the detailed build instructions.
I’m looking to make a bicycle cargo trailer of a bit more than a square meter (10-12 sq’) for about 150kg (300lbs) to fill the gap between an Xtracycle and the organ trailer (3.5 sq.m, 500kg). That aluminium cargo carrier would save me a lot of welding and weight. Dimensions (from user manual) says roughly 21×48″…
That aluminum cargo carrier is great, the quality of the bolts that comes with it is shoddy but I just got a bunch of my own from OFS.
Hey it looks like Princess Auto carries a similar one now http://www.princessauto.com/pal/en/Tubes-And-Hitch-Carriers/49-x-22-1-2-in-Aluminum-Hitch-Mount-Cargo-Carrier/8265126.p
I’m trying to use bike wheels for a custom trike project that my kids started and I’ve got to finish. From what I’ve read, “most” bicycles around here (Kitchener-Waterloo, probably the rest of Canada) use 3/8″ axles, but with a legacy British thread at 26 threads-per-inch. Could be that your 24 tpi rod (standard fine pitch) is close enough to work, but not without issues.
Selling the car would also buy a lot of toilet paper, but I like your DIY attitude.
That’s interesting to know.
The cones from the bike wheels went on ok, it’s just the outer nuts that wouldn’t go on. Once I bought new nuts they went on fine so I figured that it was shoddy hardware on the kid’s bike.
Where did you get the MEC arm??
At MEC in Ottawa. They have extra arms in stock
Thankyou!!
I did the same thing with same cargo set up but i used my old frame from my old kid trailer bolted under it was very strong and light then some one stole it fast after i built it was so sad but i will build another one thise cargo things are the best ti use
So impressed! Lucky to have the skills and a parent w the tools and talent. It is an awesome trailer.
Nice work! Way cooler to make your own trailer. Nice job repurposing the Harbor Freight cargo carrier. Now you won’t feel like a dork for spending hundreds on a generic, over-priced, branded, store-bought item like anyone with the money can buy. When I was broke I was always dumpster diving and making things from free junk. Now that I am wealthy I continue to do the same. I don’t want to look like some rich guy who lacks creativity. It’s way more fun to DIY.